

Layouts and Landscaping Small Backyards
They may be diminutive in size, but small backyards can be designed and landscaped in much the same way as their larger counterparts. From a quaint cottage-style yard to a modern, minimalist look, landscaping small backyards works best when you remember to design in square inches, not feet. In addition to this also use imaginative techniques such as creating multiple focal points, and use a varied selection of plants and shrubs. While backyards with limited space present a challenge, there’s nothing to prevent you from creating a cozy and charming retreat that can also work for family entertaining. To design a truly outstanding small backyard, follow these basic design and layout principles.
Inches, Not Feet
While most landscaping is planned out by the square foot, backyards with small footprints should be designed utilizing square inches, because fitting the amenities and plants you want in a tiny space requires a very precise layout. A mere two inches can make or break your opportunity to expand a raised planter wall to seat wall width; and just a six-inch difference here or there will determine whether you can have features such as ponds, fountains or fire pits.
Use Multiple Focal Points
Probably the biggest design challenge with small backyards is the lack of space to create that one standout focal point you often find in larger backyards. The solution, then, is to create many smaller, surprising focal points throughout your yard. Stone, ceramic, glass or metal accent pieces -new or vintage – can be arranged in such a way that they create an element of delight when discovered. For a distinct look, stay away from mass-produced items and make your small backyard uniquely yours by searching for one-of-a-kind pieces of garden art. For maximum effect, place your garden art amidst your plants, so they look as though they’ve always been there.

Don’t Stop at Green
Place bold and bright plants and flowers at the front of your small landscape so that they are the first thing to catch the eye upon entering the yard. They’ll also make the rest of the backyard recede, resulting in a larger feel to the space. Use plants with lots of texture, and try putting in a few large-leaf plants – they work wonders at changing the scale of small backyards.
Create Small Discrete Zones
As counterintuitive as it may sound, dividing a small space can actually make it seem larger. Try a tall hedge, fence, wall, or shrub to create a partition. Place furniture groupings and paths so that several small attractive and restful “rooms” are created.
Xeriscape Ideas for Small Backyards
Xeriscaping is one of the most popular landscaping options today, particularly in California, as it requires a minimal amount of water. In addition to reducing the need for supplemental irrigation, drought-tolerant landscaping can also be visually more interesting than other landscape options, and it will save you money. Xeriscape landscapes require very little turf, include plants that can withstand harsh elements and embrace designs that make small backyard landscapes really stand out:
- Use stepping stones and gravel to create a path and then fill in the side areas with native grasses.
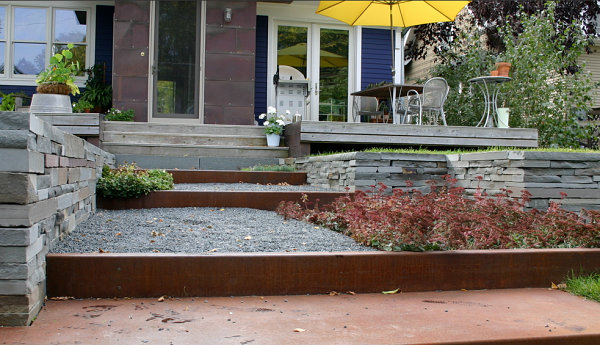
- If you have stairs up to a deck or patio, fill them with gravel and native plants to add an unexpected touch.
- Choose low maintenance greenery that will thrive in your zone and don’t forget to opt for some colorful choices – the results can be stunning.
Bringing big design to small backyards is a great way to create a space for family and friends to dine and play. So contact us for consultation. Don’t be surprised if it becomes everyone’s favorite place to gather!
Garden Design for Dry Shady Gardens
When you’re looking to improve the landscape around your home or business, dry areas with shade can be tricky when it comes to garden design. Luckily the modern practice of xeriscaping has provided many solutions that can be used to get a beautifully landscaped property even when planting in dry shade.

Basic Garden Design Principles
Any of the basics of good garden design apply to dry shady areas as well. You will want to think about how the area is going to be used, whether you prefer a casual or more formal style, and what your budget will be.
You will want to consider the size and shape of the plants and the visual lines they create. It can be helpful to start with the larger elements or focal points of your design, and then fill in the smaller details from there. Variety is necessary to create visual interest, but too many different colors, textures and plant species can create a chaotic look that lacks cohesive design. A common element such as a particular species of plant or a recurring color can help tie different areas together into an overall design.
For a successful dry shade garden design considering the water supply is vital. This is where consulting a landscape professional can be especially helpful. They will have ideas for making the best use of naturally available water. They may recommend grading an adjacent area to improve drainage, diverting extra water to a drier area. Including rain water harvesting in your garden design or changing irrigation methods may also be options.
The Importance of Plant Selection in Dry Shade Garden Design
One of the biggest decisions in garden design is choosing plants. You can get a garden design that is practical, unique and aesthetically pleasing, even in dry shade. It may limit your options a little more than having perfect growing conditions, but there are still plenty of plants to choose from. Skeptical? Check out this large list of plants for dry shade or this amazing list of native California drought tolerant plants. Many of these species grow just fine in shade. The growing popularity of xeriscaping means there are more plants available to homeowners and landscape professionals that tolerate dry conditions. Native plants will also grow better in dry shade since they are already adapted to local conditions.
One of the most useful garden design practices for dry shade is grouping together plants with similar water and nutrient requirements. Plants will not have to compete with each other to get what they need and will be more likely to thrive. Reducing the amount of turf lawn in a dry shady area or using grass varieties that require less water can also be helpful.
Soil Preparation is Key
When it comes time to make your new garden design a reality, soil preparation is especially important. The water and nutrient requirements of the new plants and condition of your existing soil will determine your exact course of action. In general, adding organic matter such as compost may be necessary. This will help your dry soil retain water and increase the nutrients available so your plants can thrive. Mulch also serves the same purpose and additionally deters weeds. Using these together will give your new plants the best chance to establish a good root system and promote growth.
While there are lot of things to consider in good garden design, the effort can save property owners money in the long run by reducing fertilizers, water, and maintenance. Get help with your landscape design and maintenance needs. Contact us today!
7 Gorgeous Flowering Shrubs for Shade
A shady yard doesn’t have to stop you from having a gorgeous, lively landscape. Flowering shrubs that thrive without direct sun are a perfect choice for jazzing up your landscape, and there are many varieties to choose from. Here are our top 7 choices for flowering shrubs that work well in Zone 9:
Oakleaf Hydrangea (Hydrangea quercifolia species)
With its spikes of beautiful white flowers and distinctive oak tree-shaped leaves, this shrub attains an impressive height and width of six to 10 feet and is partial to moderate shade. In late summer, its blooms change to a pinkish purple, and come fall, the leaves take center stage and put on an impressive show of orange-red, purple and brown, which lasts well into winter.
Rhododendron (Rhododendron species)
A shrub with its own fan club, there are more than 900 species of the Rhododendron. Most grow to a height and width of eight to 10 feet, bloom in late spring, and then present attractive foliage after that. This is the shrub to choose if you’re looking for colorful shade flowers – and with all the different varieties on the market you’ll have no problem finding your favorite color.
Serviceberry (Amelanchier species)
Another shrub with multiple varieties to choose from, you’re sure to find one that meets your yard’s aesthetic needs. The company running serviceberry is a compact four to six-foot shrub that’s perfect for smaller landscape layouts. A year-round winner, blooms debut in the spring and edible berries make a June appearance. Those who love low maintenance shrubs will love that it requires little pruning.

Japanese Kerria (Kerria Japonica species)
Slow to start but followed by rapid growth, this three to six-foot shrub is the one to choose for year-round color. Bright green leaves that appear in summer last through most of the fall, when attractive yellowish green or bright green stems appear to brighten up your winter landscape. Gorgeous, bright yellow blooms make a spring appearance.
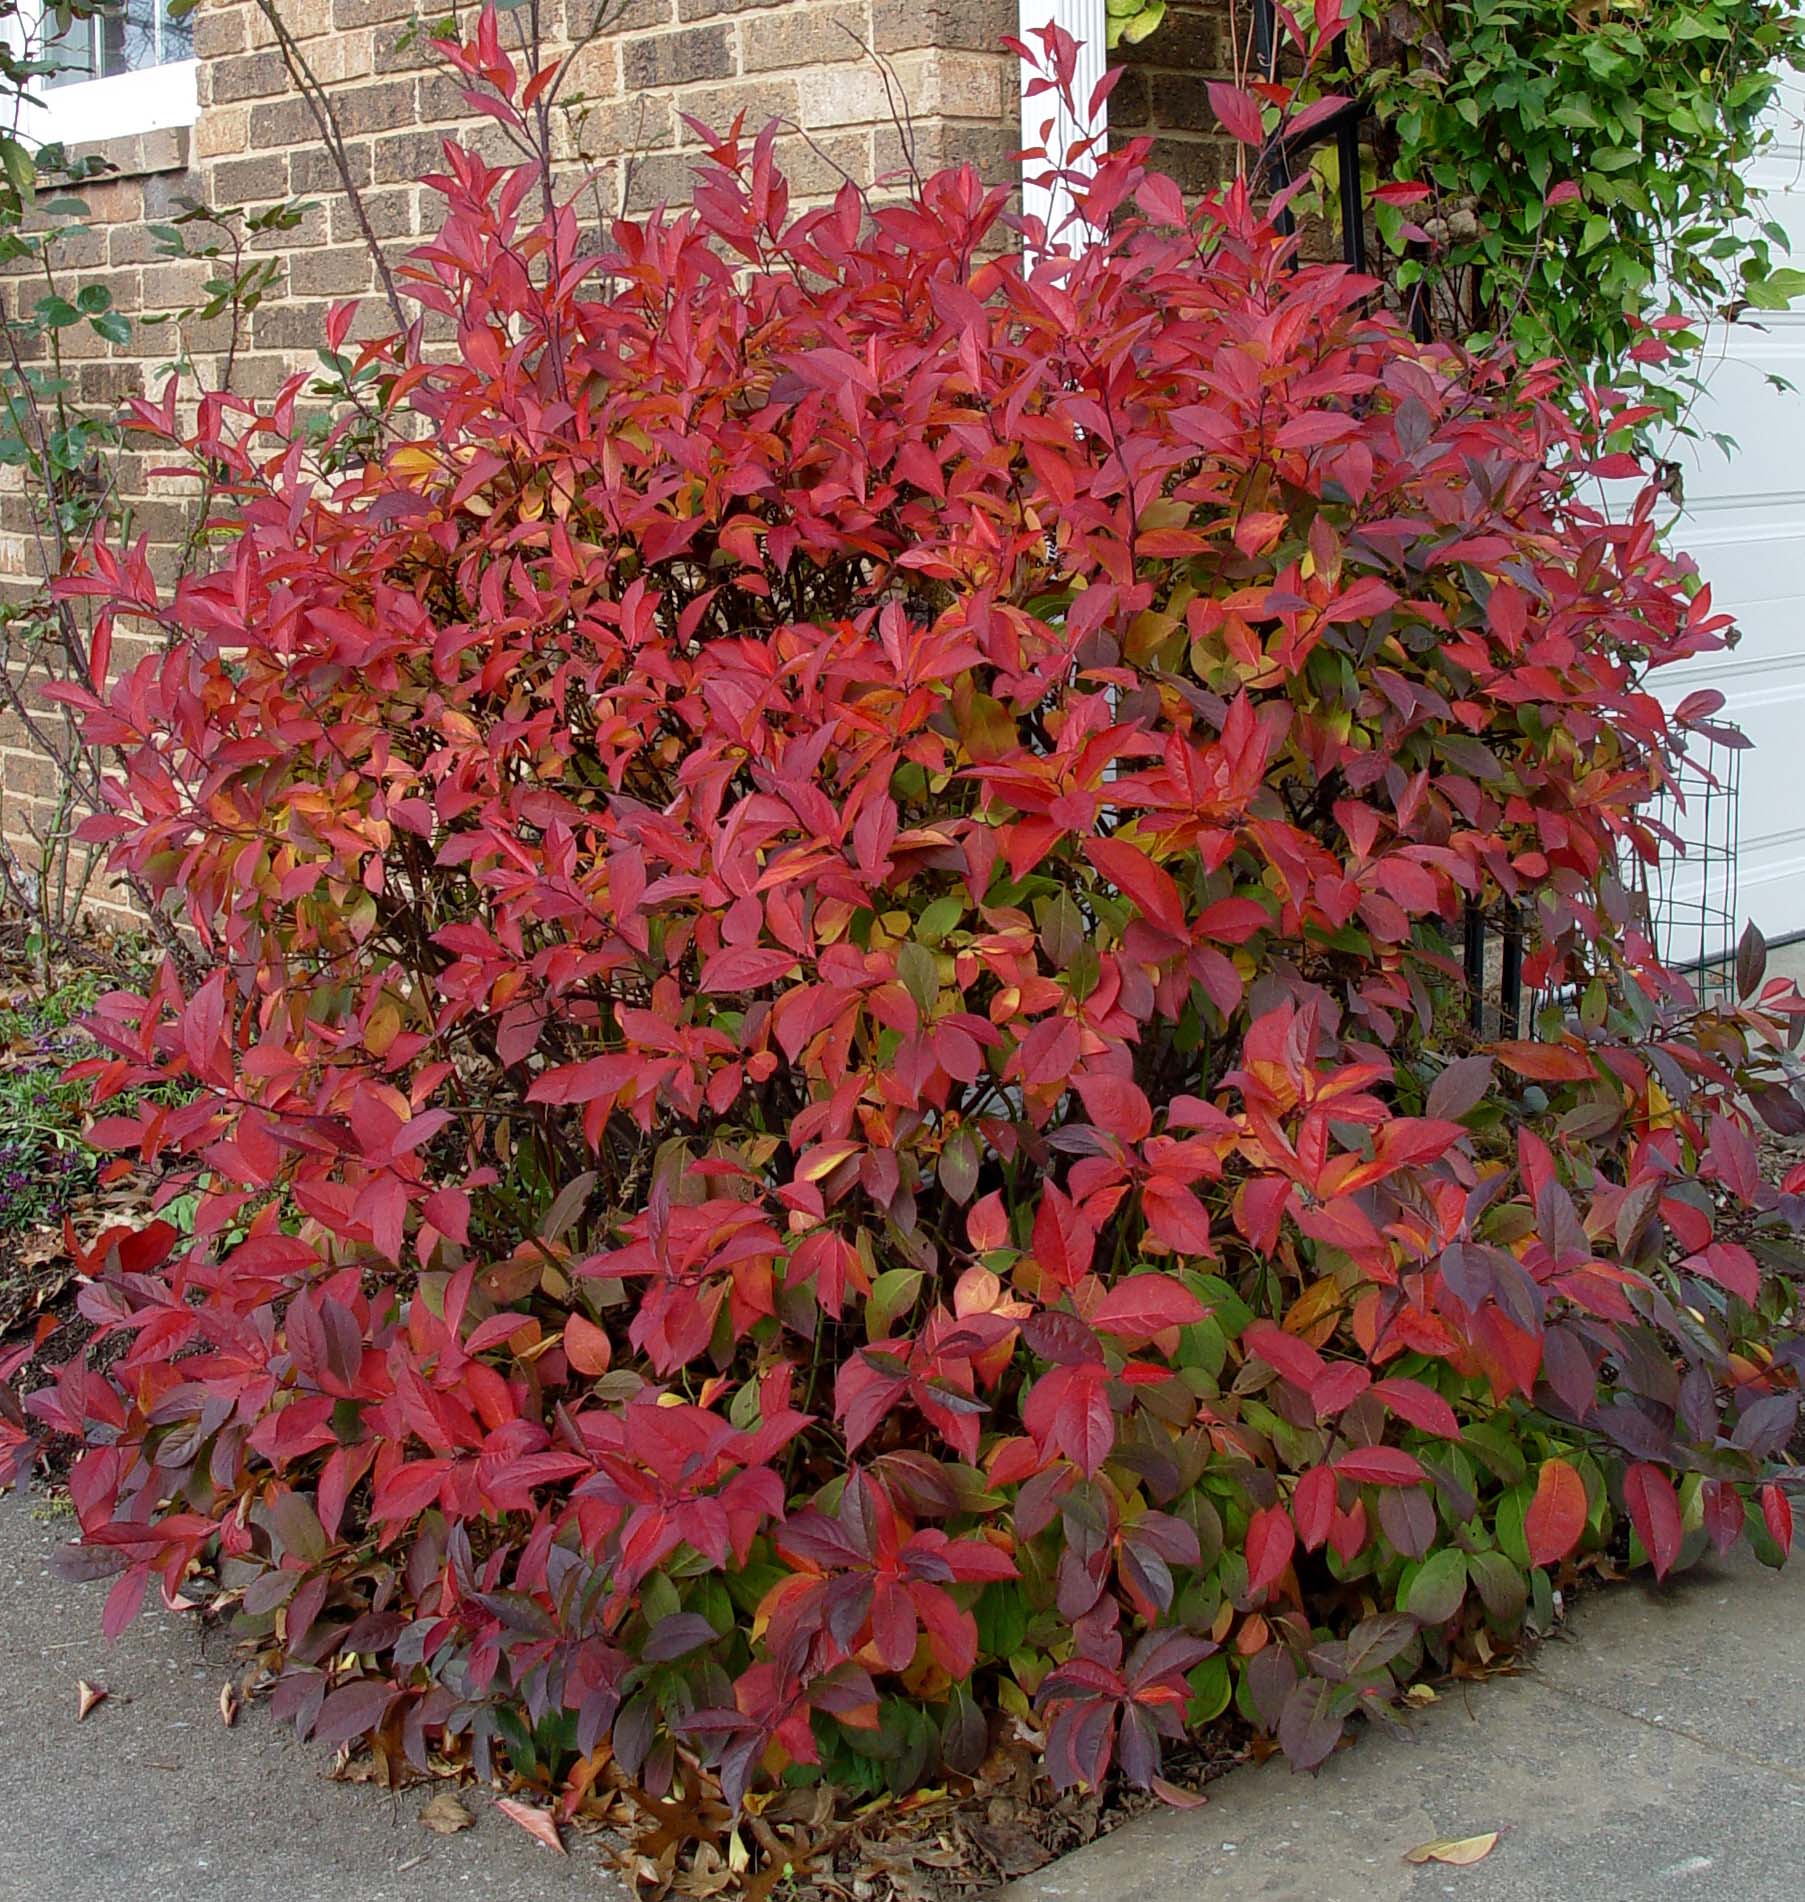
Virginia Sweetspire (Itea Virginica species)
With vivid red leaves that last well into the fall, these four to five-foot shrubs burst with fragrant summer flowers and are extremely resistant to disease or insect problems. The Little Henry is a popular choice that gives better-known shrubs such as the burning bush a run for their money.
Red Chokeberry (Aronia Arbutifolia species)
Stunning crimson leaves in the fall and bountiful red berries that brighten up even the drabbest of winters, these shrubs grow from six to 10 feet high. The red chokeberry is a resilient shrub that does well even in poor soil, and it tolerates both wet and dry conditions. Glossy summer foliage complements the small white or red-tinged blooms that make their appearance in the spring.
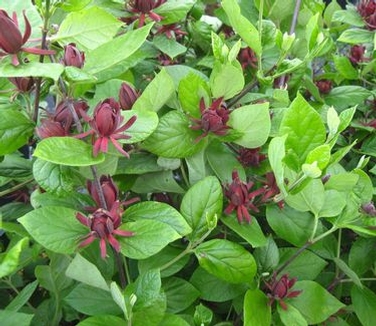
Sweetshrub (Calycanthus floridus)
A versatile classic, this moderate-shade shrub continues to gain popularity due to its xeriscaping properties. It works well in dry to damp soil and grows from four to six feet tall. The sweetshrub’s maroon flowers bloom from spring to summer and are often highly fragrant; the leaves on these shrubs have a coarse texture. If you have a yard that sees frequent visits from deer, this is the shrub for you.
Finding just the right shrubs to plant in the shady areas of your landscape may seem like a challenge, but as these selections show, there are plenty of varieties to choose from. Whether you choose one particular species as a show-stopping focal point or mix and match several kinds, these recommended shrubs should bring some beautiful color and life to even the most sun-deprived areas of your yard. Contact us for consultation on your gardening project.
Planning and Maintaining a Shrubbery
Rock gardens and shrubberies might be the two best ways to add dimension to your landscaping efforts without breaking the bank or giving yourself more work down the road. Just like a rock garden, shrubberies are coming back in style!
Shrubberies are actually easy to maintain and take care of as well. Shrubs are technically woody plants that are far shorter than most trees yet have a network of stems that can really liven up a backyard or add a little privacy to your home’s front facade.
Flowering broom shrubs and rhododendrons even look beautiful in their own right and don’t need too much support from your annuals and perennials to enliven your home.
That said, a lush lawn never hurts, so if you need help in that department DK Landscaping is here to lend a helping hand. DK Landscaping can also help with irrigation.

Planting a Shrubbery on Your Property
Shrubs are normally under ten feet in height and can either be evergreen or deciduous. This means that you can expect to find two classes of shrubs – one of which loses its leaves every autumn and then grows them back come springtime (deciduous) and the other kind of shrub retains its leaves on a year-round basis (evergreen).
- Leaving Room to Grow
Two other factors that you need to consider right off the bat is the maturity of the shrub that you’re interested in and, secondly, making sure that that shrub has enough room to grow without crowding out its neighbors.
The maturity and species of the shrub you go with will go a long way in determining how much space you need between each shrub and whether you’re letting in too much (or too little) sun to all of the shrubs you’ve planted as they go along in their growing cycle.
As an example, a shrub that’s much more bush-like and grows vertically like a arborvitae will require less sun, root space, and maintenance since it’s an evergreen and its stems don’t tend to blossom horizontally.
Bamboo palm or barberry, on the other hand, are actually quite low to the ground and need a little room to blossom out horizontally, so you’ll want to leave adequate space between each one and enough daylight so that the sun can reach down and nourish each individual shrub.
- Dig a Wide Hole
After you’ve picked out which shrub goes with the surrounding flowers and accessories in your yard, you need to transplant your shrubs and get them into the ground safely.
Digging a hole double the width of your shrub’s root ball is a good way to ensure that the roots get nourishment. After you’ve dug your hole then make sure to jostle the soil around slightly so that you’re not dealing with packed soil and your shrubs can continue to get nourishment.
- Transplanting the Shrub
When your hole is dug, carefully lower the shrub into place and put soil around the base. Then you’re going to want to spread out some mulch at the shrub’s base – just make sure that you go no more than six inches deep with your mulch.
- Regular Maintenance and Watering
Shrubs grow best in moist conditions that avoid too much saturation.
This means that regular watering from March to August in four-season climates should, in conjunction with some help from the sun and mother nature, provide most of the nourishment that your leucadendrons, rhododendrons, buckthorns and butterfly roses need to flourish.
An irrigation system is one of the best ways to prevent water waste and over-watering. For more on shrub maintenance and irrigation, contact DK Landscaping’s specialists today.
Lawn Fertilizer – Fall Vs Winterizer Fertilizer – What’s the Difference?
If you own property, you probably know that you should fertilize the lawn. However, some home and business owners are unaware that lawn fertilization should be performed more than once per year. Fall fertilizer is required as is winterizer fertilizer. The winter variety is specially designed to help your grass make it through the winter while the fall fertilizer serves its own unique purposes. Let’s take a closer look at the differences between the two.

Fertilizer Overview
It is important to note that just about all bags of fertilizer have three numbers on the front. Each represents one of the primary ingredients within the fertilizer. These ingredients stand for potassium (K), phosphorous (P) and nitrogen (N). In general, lawn fertilizer formulas typically have a formula of 29-3-4. This means that the fertilizer has 29 percent nitrogen, 3 percent phosphorous and 4 percent potassium. Both fall and winterizer fertilizer stimulate root growth. Yet each contains its own unique mix of potassium, phosporous and nitrogen.
Fall Fertilizer
Fall fertilizer is specially designed to stimulate the growth of new roots. It contains a delicate balance of potassium and phosphorous designed to spur growth. This special blend allows the grass to “dig in” and prepare for the rough winter weather. Additionally, fall fertilizer sets the stage for the lawn’s roots to make full use of the winterizer fertilizer that will be added later in the year. Fall fertilizer works best when applied to soil that has a temperature that has dropped to a 70 degrees Fahrenheit. Yet it will not be as effective if applied when the soil temperature dips below 55 degrees.
Winterizer Fertilizer
Many lawn care experts are adamant that winterizer fertilizer is the most important of all fertilizer applications. It helps the roots of the grass absorb and store nutrients as they continue to grow until the ground eventually freezes at some point in the winter. These nutrients are then readily available when temperatures increase in the spring season.
Winterizer fertilizer should be applied about four to five weeks after the application of the fall fertilizer. Ideally, this will occur at some point in October or November. By this point, the new (but empty) roots have formed and the ground is moving toward the freezing mark. It is specially designed with high levels of nitrogen to promote the accumulation and storage of carbohydrates before the soil freezes. This nitrogen is held in reserve throughout the winter, in anticipation of the spring growing season. Winterizer fertilizer also contains more potassium than regular fertilizer. The role of the added potassium is to boost the grass’s tolerance for the cold and bolster the root systems.
Winterizer fertilizer does more than just prepare the grass for the nasty winter ahead. It also functions to feed the grass throughout the winter to keep it healthy and a lovely green shade (yes, even throughout the winter). Apply winterizer fertilizer in the proper amount at the right time and it will help your grass look an even more gorgeously rich green when the spring season rolls around a few months later. Aside from increasing grass aesthetics in the winter and spring, winterizer fertilizer’s influx of nutrients also induces quicker “green-up” growth in the early days of spring.
Your Lawn Deserves Both Fall and Winterizer Fertilizer
Do your lawn an enormous favor by applying both fall and winterizer fertilizer at the appropriate times. If you have any questions or concerns about your grass, landscaping or other outdoor maintenance issues like irrigation, water conservation or general repairs, do not hesitate to reach out to us for assistance.
The Necessity of Irrigation
You want an awesome lawn. When you invest in landscaping service, you expect your lawn’s greenery — your greenscape — to remain beautiful and awesome for a very long time. Despite the fleeting nature of plants, maintaining a beautiful greenscape throughout the year is very possible. To this end, one of the most important things for you to do is to have an irrigation system installed. Although these systems are often only thought of as something for growing crops, irrigation is actually a necessity for your lawn. This isn’t just a matter of watering your plants either. Let’s take a look at why irrigating your lawn is so important for it’s health.

Irrigation Makes Your Greenscape More Durable
Rainwater and hand-poured water only moisturize plants at the surface level. Their roots, however, go very deep into the ground. This means that under normal circumstances, the bottom of your roots are extremely dry. That’s like only dipping your legs into the pool on a 100 degree day, while leaving your torso to be burned by the scorching sun! Such dryness makes it a whole lot harder for your plants to resist tougher conditions, because in addition to having dry roots, they won’t be able to gather up enough water for their plant bodies.
Irrigation solves this problem by collecting water and sending it straight down to your plants’ roots, resulting in a wet, sturdy greenscape.
Irrigation Makes Sure That Your Greenscape Evenly Grows
A bright, healthy lawn can still look patchy. This happens when your lawn gets different amounts of water in each area. When this happens, some plants are bound to grow way faster than others, resulting in an ugly, patchy appearance for your lawn. This sucks!
Irrigating your lawn lets you evenly distribute the water that gets into your lawn. This way, the patches of grass near the patio will look exactly the same as the strips of grass lining the patio.
Irrigation Protects Your Greenscape From Droughts
California isn’t the only place that has had water problems in the past. You don’t have to be in a desert to end up in a drought. In fact, low rainfall can happen just about anywhere — unless you live inside of a rain cloud! When a drought happens, your lawn’s greenscape will be among the first things to be harmed. This is because plants rely on water even more than we do to live long, healthy lives.
A good irrigation system can fully protect your lawn’s plants from a drought by spraying water on the plants regularly, even if it doesn’t rain all season.
Irrigation Reduces Your Workload
Even if you have two green thumbs and green big toes, maintaining a lawn isn’t easy. One of the hardest parts of this process is making sure that your plants get all of their proper nutrition. An irrigation system handles the lion’s share of the workload needed to keep your plants healthy, because they will provide them with all of the water that they need on a daily basis. In fact, if your lawn has plants that crave more water than usual, your irrigation system can send plenty of water to your plants multiple times per day.
Irrigating Your Greenscape Takes The Worry Out of Lawn Care
Having an awesome lawn is your goal. Achieving that goal shouldn’t be such a hard thing to do. By investing in a lawn irrigation system, you will make sure that your lawn is absolutely awesome at all times. Contact us to learn more about the benefits of lawn irrigation, and what types of systems are available.
Building a Rock Garden: Everything You Wanted To Know
Rocks gardens, sometimes called alpine gardens and less commonly rockeries, are structures made from stones, rocks and boulders that you can build around your garden populated with perennials and annuals to really set it off.

Rock Garden: What You Should Know
Usually rock gardens are role players or a kind of supporting cast for the main players that are your perennials, biennials and annuals.
The exception would be some Zen gardens in Japan that are designed almost exclusively from rocks, boulders and sand and designed to open the doors to enlightenment…but for now we’ll keep both feet squarely planted in the real world.
- Why Create a Rock Garden?
A lot of homeowners want to know right off the bat why they should be investing their time and energy into a rock garden in the first place.
That’s a great question and the answer really boils down to aesthetics and practicality. On the aesthetics point, rock gardens can lend a rugged air to your garden and make a very natural complement to your roses and annual flowers.
The other side of the coin is practicality: Rock gardens make a lot of sense if you’re working with an area that hards to reach with a lawnmower and provide regular maintenance to.
Many homeowners also consider putting up a rock garden to make a clearer demarcation line between an outdoor patio area, mulch and their garden proper. This really lends a lot of perspective by creating a more dynamic environment and allowing you to naturally get a wider color palette into your backyard.
- Where to Plant Rock Gardens?
You definitely want to select the right rocks and stones for the job when it comes to creating a rock garden that naturally allows you to find the optimal balance between earth tones and flowering brilliance.
For instance, if you have a lot of outdoor space in your backyard and a slight undulating up (or down) that might call for a staircase comprised of stone slabs or a tiny pebble walkway, then you could try something like this to lend more perspective and work with the existing elements.
You can even light the way with sconces along your pathway and combine stone slabs with more petite rocks forming your walking path. A few low maintenance yet vibrant perennials like dahlias and creeping thyme can work great running along the side too.
If you’re dealing with a really steep slope, then working in some larger rocks or complementing preexisting boulders can make a great retaining wall or framing device for a rock garden down below. A combination of flowers, shrubs and chips can set things off underneath.
You might also try erecting a rock garden near hard-to-reach areas running along a fence or hilly areas as these really are the perfect excuse for building up a rock garden and turning lemons into lemonade with your next outdoor project.
- Can I Still Go Zen?
You absolutely can still incorporate aspects of a traditional rock garden into your next backyard project!
The Zen Temple of Ryoanji means The Temple of the Dragon at Peace, and it’s easy to see how it got that name: Using open space to its advantage, Zen rock gardens are peaceful reposes and typically only call on a few rocks, pebbles and moss to achieve their tranquilizing effects.
To create your own Zen rock garden use edging stones, pebbles and prune your plants to fit the aesthetic you’re going for. For help getting there, contact us the gardening professionals.
Flower Bed Ideas – A Few Good Tips You Should Follow
Flower beds are one of the most convenient ways of sprucing up your outdoor decor and beautifying your entire yard.
Planting a flower bed is also a labor of love for millions of homeowners who already have the knack (and experience) for it; for those who don’t, the rest of this post if for you.

And if you’re still worried about your garden or you feel like your entire yard could benefit from aeration, then don’t hesitate to contact us your lawn experts. Now, let’s get started:
Tips for the Perfect Flower Bed
The perfect flower bed brings together form and function by applying a few simple tips in order to create a whole that’s greater than the sum of its parts.
- Focus on Framing
Part of the “form” part of creating the ideal flower bed for your home is going with a melange of perennials, annuals and shrubs for variety and framing.
In the same way that what’s in the background on a stage set can help to frame all the action going on in the foreground, you want a “framing device” in the back of your flower bed to draw your eye into the action.
A good rule of thumb is to plant tall perennial plants in the back of your garden to get the most out of everything going on upfront.
If you’re on a tight budget or you want to make a simpler landscaping project for yourself, then you can always put shrubs behind your perennials and annuals as well.
- Blend Perennials and Annuals
Annual flowers cycle through the germination, seeding, flowering and expiration process in one single year whereas perennials are able to grow from one year to the next with an off-season of dormancy in the winter.
The good news is that perennials like roses, daylilies, and peonies tend to play nice with annual flowers like marigolds and zinnias when it comes to finding the right balance between earth tones and more vibrant colors for your home garden.
- Combining Earth Tones and Vibrancy
In particular, the pink of a blossoming peony tends to work beautifully with the vibrant red of most roses. Marigolds and zinnias can also work well together if you’re looking to combine more tropical orange and yellow tones into your next flower bed.
Zinnias are actually easier to cultivate than most annuals and come in a myriad of colors that can make any garden really pop and dazzle guests.
You can find zinnias in purple, crimson, rose and scarlet to suit your tastes and make a flowing color combination with actual roses or even peonies when it comes time to get going.
Putting on the Finishing Touches
Once you know the kind of look that you’re going for and how to frame it with shrubs and/or tall perennials, then you want to move onto decorating fences or surrounding wall structures.
For this the beautiful pink and purples of an annual flower like the climbing snapdragon or greens, purples and yellows of passion flower can work very well.
Peony and roses upfront with climbing snapdragon or passion flower snaking along overhanging structures are an awesome want to frame your garden as well as beautify your home and complement your other landscaping efforts.
For help with aeration, irrigation, gardening or regular landscaping maintenance, or just to find out more tips like these, get in touch with DK Landscaping today.
Practical Winter Gardening Advice For Homeowners

Are you looking to get the most out of your garden year-round? The good news is that a lot of common shrubs, plants and flowers do well against frost in more intolerant hardiness zones.
So, what is a hardiness zone and how does it affect your winter gardening? A hardiness zone is a map put out by the USDA that basically tells gardeners which plants work best in which climates.
General Winter Gardening Tips
What’s important to realize upfront is that plants that can withstand the frost usually enter a period of relative dormancy to survive the winter months.
So, what are some things that you can do to make this transition easier on your hardy plants and perennials?
- Remove Waste
Removing any refuse, blackened-out stems and leaves from annual flowers is a great way to lessen the possibility of pathogens in the soil harming your hardy plants during their dormancy period.
- Install a Cold Frame
A cold frame (more on this below) is a raised wooden structure with a plastic cover that can further help protect perennials and hardy bulbs against the elements.
Even when plants are considered perennial, they still might benefit from the protection that a cold frame offers – especially if the temperatures drop to below zero with the wind chill.
- Apply Winter Mulch
On the topic of mulching, you should also realize that a lot of your summer mulch may have already decomposed at the start of winter.
Laying down a fresh layer of winter mulch goes a long way towards protecting your hardy plants and underlying soil during winter.
http://gardening.about.com/od/winterinthegarden/a/WInter_Mulch.htm
You can actually work with the elements by turning the fall’s fallen leaves into a winter mulch that will stay frozen and protect your garden.
Winter Gardening Devices to Consider
In addition to paying attention to your hardiness zone, devices like a quick-hoop system, floating row cover, or cold frame can greater buffer those punishing winter winds and cold temperatures.
- Quick-hoop system
Quick-hoop systems are also called low tunnel systems, and by whatever name these structures have been known to protect your plants from winter’s frost.
Annual and perennial hardy plants are able to survive the rigors of winter, frost and heavy winds. This means that calendula, foxglove, pansies and peonies require little maintenance during winter beyond the protection from a low tunnel system.
Hardy plants like these require less light to develop fully and can withstand hard frosts. Hardier plants only require around four hours of sunshine every day and grow best in cooler conditions.
If you’re living in an area that gets less frost, then many of these plants can be grown throughout the winter months. It’s recommended, though, that you plant hardy plants when the soil temperature is around 40 degrees fahrenheit – perhaps in very late winter or very early spring.
Low tunnels provide more protection against cold temperatures, frigid winter winds, and more relative humidity than the surrounding environment.
http://www.motherearthnews.com/organic-gardening/low-tunnels-quick-hoops-zmaz09onzraw.aspx
- Floating Row Cover
Floating row covers are probably the most simple and straightforward form of winter protection.
Putting your hardy plants under a thin film can protect against cold, harsh winds and potential hail damage while allowing an extended growing season for hardy plants and perennials.
- Cold Frame
The most popular kind of cold frame is a portable cold frame encased in wood with a durable plastic cover to protect against the elements.
That said, there are three types of cold frames (pictured here) that can extend your growing season well past frost. For more winter gardening tips, contact the professionals at Xeriscape today.
Lawn Treatment Tips to Prevent Crabgrass & Dandelions

Nothing ruins a lawn’s uniform, well-manicured appearance like dandelions and crabgrass. These invasive weeds make a lawn look shabby and poorly maintained — and when they set up shop, they can be a nightmare to remove. Thankfully, these lawn treatment tips will help you prevent crabgrass, dandelions and other unsightly weeds from taking residence in your yard.
Keep Your Grass Long
Crabgrass seeds in particular germinate with exposure to sunshine. One of the most useful lawn treatment tips you can follow is to set your lawnmower’s blades so they’re as far off the ground as possible. You’ll have to mow your lawn more often to keep it looking good, but the resulting tall, thick grass growth will shade the ground better, and keep crabgrass seeds from germinating.
Fertilize Your Yard
Make sure you fertilize your lawn at least once a year. This is one of many lawn treatment tips that you should be following, even if you don’t have a weed problem! It’ll help your lawn grow in thicker and stronger, which will allow your grass to compete better with any dandelions or crabgrass that tries to take root.
Reseed Your Lawn
Weeds typically grow in patchy areas of your lawn, where they have little competition from your grass. If you’re seeing worn spots in your yard, most lawn treatment tips advise you to reseed your lawn in fall. Make sure you tear out all existing weeds, or use herbicide on them, so that your grass can take root and thrive. Once the new grass is established, it’ll be able to deny any invading weeds the chance to take root.
Water Your Lawn Deeply
Most weeds thrive on infrequent, shallow watering. One of the most useful lawn treatment tips you can follow is to water your lawn seldom — on the order of once a week — but deeply. Your grass appreciates this better than your weeds do. It’ll give your lawn the chance to soak up all that delicious moisture, and build a strong root network that can resist invaders. As a bonus, that healthy root network will be more resistant to high temperatures!
Use a Pre-Emergent Herbicide
Many people may balk at applying herbicides to their lawn, so this is one of the lawn treatment tips that’s most useful if your lawn continues to suffer from weeds, after you’ve taken other options. Pre-emergent herbicides are highly specialized weed killers, so they won’t kill existing weeds effectively. Rather, they keep seeds from germinating, so they work best when applied in early spring or late autumn, and only when you’ve successfully followed other lawn treatment tips to remove crabgrass and dandelions from your yard. When you’re choosing a herbicide, always be sure to follow all instructions on the package carefully.
Removing noxious weeds like crabgrass and dandelions, when they’re established, can be a real pain. An ounce of prevention is worth a pound of cure, so follow these lawn treatment tips and put bothersome weeds out of your mind!


